Many people are moved by news of honey bees’ decline and they instinctively want to help. This e-book shows gardeners and beekeepers how they can help honey bees by providing them with an optimum diet available for as much of the year as possible to boost their chances of survival in an ever hostile environment.
You don’t have to be a beekeeper to help honeybees! Potentially your garden can provide everything they need to live – nectar, pollen, propolis and water. Find out what they like and why, in this fascinating book all about the synergy between honeybee and plant. Continue reading Beeginner Beekeeper
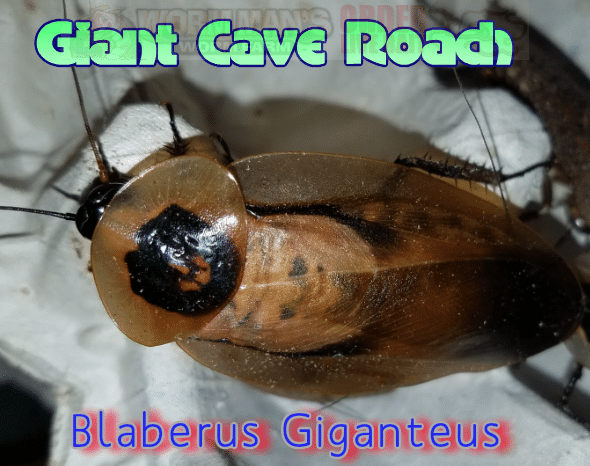
Giant Cave Roaches are a very large roach species that requires a certain amount of care to flourish. They require vertical bark spaces in order to molt and like a deep and moist substrate with fallen leaves and rotten wood.
They love orange slices and fish flakes but will eat almost any of the normal roach fare.
Keep them between 70 Degrees and 85 degrees for best growth and breeding.
Their enclosure should be tall to allow them to cling to the vertical structures when molting.
Do not allow Giant Cave Roaches to become overcrowded or it will reduce their life span.
Giant Cave Roaches are Ovoviviparous, which means they lay eggs inside of their bodies and then hatch out live young once the eggs hatch.
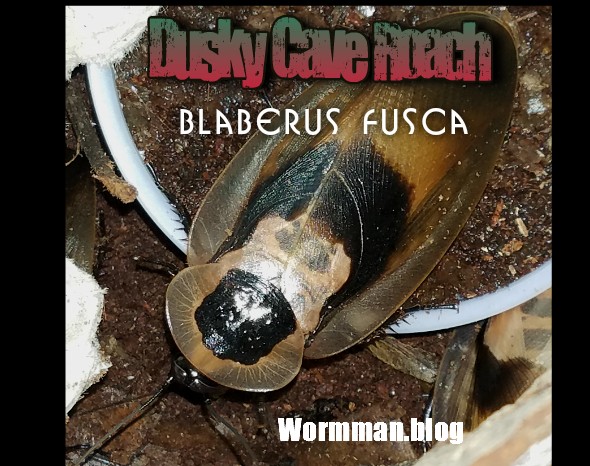
The Dusky Cave Roach is a large roach that cannot fly. They are easy to raise if you ensure that they have ample room, vertical spaces for shedding and hiding, a damp substrate and food. Blaberus will really do well with good airflow and temps between 75-85 Degrees.
Home: Any tall container that will allow vertical spaces, like tree bark or egg cartons standing on end so that Blaberus Fusca and hang and molt.
If you knew that nearly 86.5% geckos die very young and within two years of their captivity, then you’re going to discover in this message how to stop that from happening. True, it’s not easy to raise a Tokay gecko as pet.
With the geckos originally coming from deserts, the biggest problem that most owners face is creating the right kind of environment for the gecko to comfortably grow up in outside their natural habitat. Continue reading Tokay Gecko Lizard Care Information
Most of our customers who buy live worms and crickets for bait, use those worms and crickets live on the end of their fishing hooks. Many also use preserved bait that was once alive as part of their bait repertoire.
What does a fisherman do with all of those extra giant mealworms, redworms, European Night Crawlers, African Nightcrawlers, Crickets and Waxworms at the end of the season? Many let them die, or throw them away, and some will try to breed them. Why not preserve them so that you will have bait well into the future? The cost savings, in the long run, could well be worth the upfront costs of the preservatives used in the process.
Think about the possibilities of being able to buy grubs, Bloodworms, leeches, meal worms, frogs, flies, pork, bees or anything that you might find in the wild for bait, and preserve them for future use with just a few ingredients that you can find right using the links below, or even from your local pharmacy.
I have found cases of small booklets in our office by Charlie Morgan, written in 1970, titled How To Preserve Bait of All Kinds. We purchased cases of this booklet a while back and we are offering them at cost to you. Shipping is included in the price. You can see that the booklet is going for $10 and $25 on Ebay and Amazon, but we bought these in bulk about 15 years ago and we are offering them to you for $5.95 with free shipping via US mail. The booklets are 24 pages long so they are easy to read and follow.
It is a bit dated and does not mention how to dispose of the ingredients used to preserve bait. I will caution you that you should only preserve bait if you are planning on selling preserved bait, have a means to dispose of the ingredients and have adequate latex gloves, goggles and other protective clothing and ventilation.
The booklet has a great deal of information on exactly how to preserve bait and even some tips on caring for and growing some of organisms used for bait. It also touches upon packaging and selling the bait. Heck, the booklet even explains how to preserve pork rinds.
If you are looking to preserve a great deal of bait, or want to start a small bait business, this booklet can get you well on your way. It also just makes for an interesting read for anyone who might be interested in how it is done.
There are really 3 ingredients that Charlie Morgan mentions and I have placed links to where you can find those ingredients below. They are still readily available.
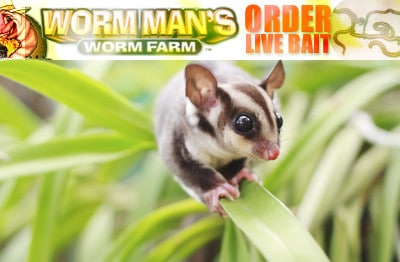
Sugar Gliders love mealworms. Did you know that? Many of our Wormman.com customers are Sugar Glider owners and they tell us how much their Sugar Gliders eat mealworms like they are candy, so we figured that this guide might help our Sugar Glider moms and dads.
Some of the reviews that we have received:
“A fantastic guide to these wonderful little animals. It covered everything I needed to know. I now consider myself an expert on sugar gliders and have the confidence to properly look after them.”
“It’s great to have found such a comprehensive and well written book that provides both the positive and negative sides of owning sugar gliders. I now feel fully prepared. This book is a keeper!” Continue reading Sugar Gliders Or Sugar Bears Information Guide
Keeping a compost pile going year round in New Jersey is a challenge, especially this year because we had almost two solid weeks at zero degrees. If you’d rather not go out into the cold and snow to dumb your kitchen scraps on your rock solid, frozen, compost pile, consider setting up a worm composting system indoors. You can keep this going year round. Worms will process your kitchen, paper and cardboard scraps.
Start your vermicomposting project on a small scale, and expand as you learn. You can graduate to bigger and bigger worm bins, and more worms until you eventually graduate onto a multiple bin system, or even on to a large worm bed.
To get started, you’ll need a worm bin, some bedding, some water, the right kind of worms and some food.
Drill 8 to 12 quarter-inch holes in the base of the tub for drainage, and then drill some half-inch holes along the upper edge on both sides for air circulation. Nest your tub into a plastic tray on top of blocks, or upside down plant pots in my case. Don’t worry that the worms are going to try to escape through the holes, they would rather stay in the bin unless there’s something very wrong inside the bin. Your bins should be no more than 18 inches deep so that the material in the bin doesn’t become too compacted. The worms need to be able to move freely through the bin, and they need plenty of air.
Bedding is the stuff in which the worms crawl around, and where you bury your food. It needs to be light and moist and fluffy. My favorite bedding is shredded newspaper with some shredded leaves or coconut coir added in.
The type of worms that you need for worm compost, or vermiculture are called Red Wiggler, or Eisenia fetida. They’re much smaller than earthworms, and they reproduce really well in captivity. They process a lot of organic matter, and they don’t mind being disturbed. Regular earthworms that you find in your garden will not work for composting. Those worms burrow very deeply in the cool soil, and they do not survive when kept in a container. You can order Red Wigglers from a garden supply catalog a bait shop, or here at Wormman.com
How many worms do you need, and what can you feed them? Get yourself a small kitchen scale, and weigh the food scraps that you generate every day for one week. That means fruit and vegetable scraps, coffee grounds, tea bags, and grains. No meat, bones, fatty products, or dairy. Worms can process about half their weight in food per day. If you generate an average of four ounces of food scraps per day, then you would need eight ounces of worms in your bin in order to process the food that you’re going to be adding on a daily basis.
If you start with a smaller amount of worms, just feed them less. Their population will grow, and you’ll be able to feed them more over time. When you get your worms, you want to sprinkle them on top of the bedding. Remember, the bedding needs moist but not wet, and should be fluffy.
Then put the lid on the bin. They will quickly burrow down into the bedding. On your lid, take a piece of paper and draw a grid with eight equal sections. Every time you feed your worms, you’ll put the food in a different section, and you can mark the date that you put it then there. You’ll go in a clockwise direction around the bin. The worms will follow the food source. By the time you get back to that first spot, you should no longer recognize the food that you put in there. If you can still see recognizable food, then you shouldn’t put anymore in until it’s gone. I put eight ounces of worms in this moist bedding, and here I have four ounces of food scraps. I’m going to start in the section number one, just pull the bedding aside and bury the food shallowly.
That’s the extent of how you feed them. You put the lid back on, and put the bin in its nesting tray. Be careful that you don’t overload your bin with food. If you do, it can become smelly and you can develop a fruit fly problem. You want to go at the pace that the worms can consume. Take it slowly. It’s normal to see molds and very tiny creatures inside your worm bin. They’re all part of the worm bin web of life. Now here we’re fast forwarding to a bin that has been operating for several months. It looks quite different in here, much darker material. The bin will gradually fill with worm droppings or worm castings as they consume the food and the bedding that you put in here. This is a nutrient-rich material that you can put on your garden.
Once every few months, you’re going to need to harvest the castings from the bin, and then put the worms back in with fresh bedding to keep them going. Get yourself a sheet of plastic, and then scoop out the composted material. You can create a little windrow or some small cone-shaped piles. The worms that are in this material will quickly burrow down to the bottom of the pile.
They don’t like being exposed to light or dry air. One way to make them move a little more quickly is to set up a light and shine it right on the pile. You have to wait a few minutes, just continuously brush the composted material aside. The worms will continue to burrow down to the bottom of the pile to the point where eventually all you’ll have left is a pile of worms, and a separated pile of composted material.
The end product, or worm castings can go into your garden or be mixed with potting soil for houseplants.
If you are worried about flies, make sure that you bury your food scraps as outlined in the grid system above.
Why spend $90 per 3# package? What you want is a bee swarm! Just buy the Swarm Trapping book and get your bees for (almost) free!
Yea, I’m McCartney, that YouTube Beekeeper guy. And I’m passionate about bees and beekeeping and am the author of Swarm Traps and Bait Hives. I’ve really enjoyed Swarm Trapping and wrote the book on it so others can enjoy this great way to get FREE BEES! (well…kind of free.) Continue reading Catch Free Bees!
THIS MIGHT WORK FOR OTHER PEOPLE, BUT HOW DO I KNOW IT WILL WORK FOR ME? It’s easy to look at a self sufficient garden thriving and delivering your favorite fruits, vegetables, herbs spices, flowers, and think that it is somehow different than your garden. But it was just a few years ago that I was working hand over hand, on the verge of giving up and throwin away money, time, and energy on my homes backyard. Every Gardener Should Know This Often people choose to go into gardening as a lifestyle to save money on groceries or as an enjoyable pastime. Meanwhile they think this will benefit their financial situation, however most gardening techniques are too expensive to effectively contribute to the well-being of an individual, family, or community. Cost of tools, equipment and garden startups are often not accounted for and may cause problems down the line. To get around this problem, I would like to invite you to start using a technique that will prove to be a resolution and will result in your garden having more value while saving output costs. I decided to journal my experiences at the Sonoma State Environmental Technology Garden where I worked throughout my college years. Here we produce thousands of pounds a year and donate it all to the local food bank for low income families around the county. Using these techniques in a backyard garden would allow a family to have an abundance of food, and the greatest thing about this type of garden is that it uses self-sufficiency to cut down on unnecessary work. I’m nobody special. I’m just a guy who learned and studied agroecology practices and found techniques that will work for anybody! I’m a guy who’s tried a…
Please check out https://www.Invertebrateauction.com if you are looking to buy and sell your own invertebrates. Dismiss
Home
We are glad you are here. It gets lonely just talking to worms, crickets and fruit flies all day. Please engage with me, ask me a question or post a comment. Check out our forum and our directory. If you need worms, roaches or any type of feeder insects, please try Wormman.com


You must be logged in to post a comment.